Created by Simon Karman and Lisa Pruijn
Published on 2021-02-25
It is a lot of fun to build your own website. Unfortunately part of building a website is hosting it and publishing it every time you make a change to it. In this article I would like to show you that hosting, publishing, and even setting up an automated deployment pipeline is a piece of cake!
lisapruijn.nl is a great example of this.
Are you still spamming F5 on your machine while developing your website to see you changes, are you still uploading files manually via ftp to publish your website, or are you still write plain html and css, then this is the perfect read for you. In one evening, without much programming experience, you'll be able to setup an development and production environment for your personal website.
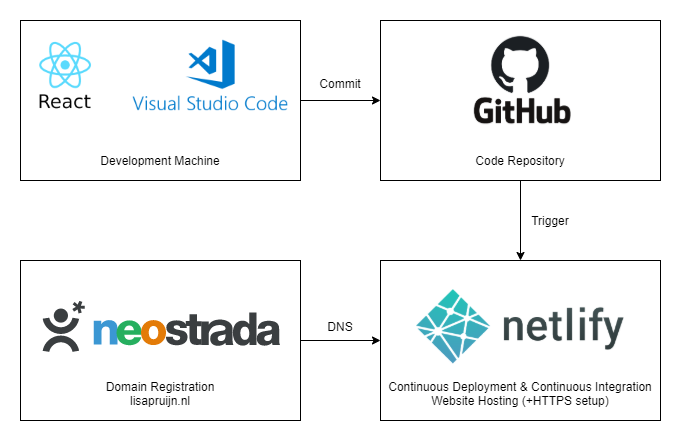
The Architecture
The diagram below describes the architecture. This structure can be setup in one evening. It contains four different components: your development machine, the code repository, a hosting platform (including the cicd pipeline), and a domain registration.
Your Development Machine
Our goal is to show a webpage that is accassible through the internet from your mobile phone or computer. Let's start by creating this page. To do this we'll first need a tool to write our code in. There are many options here such as Intellij IDEA, Webstorm, Sublime Text, and many more. We have decided to use Visual Studio Code (VS Code). Once you have installed VS Code you also need to install Git (for our source code management) and Node (for building our website).
You can download VS Code here: https://code.visualstudio.com/ You can download git here: https://git-scm.com/ You can download Node here: https://nodejs.org/en/
Note: A restart of your computer might be required.
After downloading and installing these programs you should be able to open VS Code. In the top bar you can click on Terminal -> New Terminal to open a new terminal (Ctrl + Shift + `). In this terminal you should be able to use both git and Node. You can verify this by running the following two commands.
git --version
node --version
If they are installed correctly you should see the version information of both tools.
Next you can install the framework that we'll be using to develop the webpage, React. React is a library for building user interfaces. More information on React can be found here: https://reactjs.org/. To install React run the following command from the terminal.
npx create-react-app my-website --template typescript
In the above command you can replace my-website with the name of your website. For example: lisapruijn.nl. This will create a new directory in which it will setup a git repository, node project, and install the required typescript and react dependencies you need. You can read more about the TypeScript language here: https://www.typescriptlang.org/
First open the directory you just created with the npx command in VS Code. You can do this by going to File -> Open Folder and there selecting the folder you just created.
You should now be able to start your local development server on your local machine by running the following command.
npm start
# then visit http://localhost:3000 to view your website
If you now change the src/index.tsx by replacing the placeholder text with some information about you. Notice that when you save your changes in VS Code, the website automatically refreshes in your browser for you to preview your changes. You can read more on hot reloading here: https://blog.logrocket.com/setup-react-hotloader-in-10-minutes-3175dfdbf38a/
If you're happy with your changes you can either use the Source Control manager in VS Code (under Ctrl + Shift + G) or use Git from the commandline. To use git from the commandline run the following commands to add, commit, and push your code.
git add --all
git commit -m "My first changes"
git push
When pushing the code to git you'll notice that an error will pop up. This is because we havent setup a repository to push or code to yet. This is what we'll do in the next section.
Code Repository
We need to host the code of our website somewhere. For this we'll use a version control system called Git. Git is a free, open source, and is designed to handle everything from small to very large projects with speed and efficiency. Git is easy to learn and has a tiny footprint with lightning fast performance. More information on git can be found here: https://git-scm.com/
You can use BitBucket, GitLab, and other provides for this. We decided to use GitHub. You can create your own GitHub account for free here: https://github.com/.
Once you have created your account and logged into the website you can create a new repository. Give it a clear name such as lisapruijn.nl, add a description, set it to either public or private, and please choose NOT to initialize the repository with any files.
Once you have created your repository you should see a command that looks like the command below. Please replace the your name and your repository name (including <>) with the actual values and run the command in your terminal. This adds the just created repository as one of the remotes of your local repository.
git remote add origin https://github.com/<your name>/<your repository name>.git
After doing this, you should be able to push your changes to you repository. You can do this by running the following command.
git push -u origin main
If you now visit your GitHub account in the browser you should be able to find your code and changes there. Now every time you make changes locally and have verified they look good on your local machine (with npm start). You can use the following three commands to push your changes to your git repository.
git add --all
git commit -m "An explanation of the changes that were made"
git push
Hosting
You want visitors of you side to see the actual website you build, and not the code you have written. To do this we'll to build our code into an artifact and publish this artifact to a hosting provider. There are many websites and services that provides this, but the provider we're using today is Netlify. More information on Netlify can be found here: https://www.netlify.com/. For small use it is free to use Netlify, but please check the pricing page if Netlify is suited for your needs.
At Netlify you also have to create an account. After you created your account you can click the green Create a new site from Git button. There you can add your GitHub account and select the repository you just created for you website.
Make sure that you set the build command to npm run build and the publishing directory to dist. This ensure that the package is build correctly, and the dist directory is used as the artifact for the hosting of the website.
Once you have setup your project in Netlify you should be able to visit your website on http://<your netlify project name>.netlify.app by replacing your netlify project name (including <>) with the name of your project that you just created in Netlify.
Domain Registration
Instead of the netlify.app url, you'll ofcourse want to use your own domain name. To achieve this you'll have to buy and register you own domain name. If you don't want to pay any money you can skip this section.
Domains names are labels (such as your street adress) to navigate the internet. When you buy a domain name you can configure where this domain name navigates to. This is the domain name system, DNS. Once your have registered you domain name you can change the DNS settings of your domain name. In our case we want to point the root domain name (@lisapruijn.nl) and the www subdomain (www.lisapruijn.nl) to our netlify app.
The domain name registration company I use and trust for all my domain names is NeoStrada. You can buy your own domain name via NeoStrada here: https://partner.neostrada.com/idevaffiliate.php?id=385 (please note that this is my affiliate link).
Once you have bought and registered your domain you can go to Dashboard -> Domainnames. Here you should be able to find the domain name you just bought. You can click on the gear icon and chose Change DNS settings. If you scroll down you can see the individual records for your domain name. There should be quite a few that are automatically created by NeoStrada.
To configure the DNS in such a way to point to our Netlify app you'll have to add the following two DNS records:
@ A 104.198.14.52 0 3600
www A 104.198.14.52 0 3600
Note: that changing DNS records can take up to 24 hours to propegate through the domain name system.
More information on how to setup your DNS records for Netlify can be found here: https://docs.netlify.com/domains-https/custom-domains/configure-external-dns/. This also shows an example of how to setup branch subdomains to automaticly turn your feature branches in to their own subdomains.
After you have setup your DNS records in NeoStrada you can go back to Netlify to add you domain name as the primary domain of your projects. Once you have done that you can scroll to the bottom of the page to enable TLS (Transport Layer Security) for your websites, which ensure your visitors will visit your website securly using an HTTPS connection. It can take a bit of time before the generation of the certificate succeeds, please try again after 1 and 24 hours.
Final Remarks
Now every time that you make changes on your local machine, commit those changes, and then push that to your repository. Your website should update within a few minutes.
The next steps! For those new to HTML you can read this excellent article on how to get started websiteplanet.com/blog/html-guide-beginners
Please keep in mind that Netlify has pricing plans based on your usage: netlify.com Read more on how to use Git: git-scm.com/doc Follow a tutorial on how to develop your website in React: reactjs.org/tutorial
I hope to have given you a nice starting point for you personal website. Happy coding!